Week Two
Ok, this time I will show you another task we had for Game Texture Development. This week we had to do a spellbook.
First off I started modelling it in Maya, which is pretty straight forward. I started with a basic rectangle shape. After that using the edge loop tool I split the object and after that it was easier to extrude and warp the object giving it a curve, so it looked more like an old, worn book. After modelling the cover and the pages, I used the bevel tool to smooth the edges of the back of the book, so it looked more pleasing to the eye. When I finished modelling the book, I started modelling the clasp for which I used the same methods and tools. With the modelling finished, I had to delete my history and combined the two objects into one, so they shared the same UV space. You can see the final result of the modelling below:


Unlike the crate, the book has a lot more face's and when it comes to the UV's it is more difficult. But in the end in comes to the final result with trying and practise. This time I applied a checker box texture to help me with the UV layout, which I used to help me see what kind of quality I would get on the different surface's. Having done that I used planar mapping based on camera and after that started working on my UV's in the UV Texture Editor. The final result you can see below:

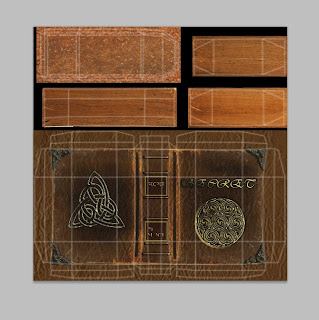
After laying out all my UV's, I made a UV snapshot, saved it as a targa file and after that I put it in Photoshop. Starting of with the cover, I used some basic textures from www.cgtextures.com of leather. I wanted to achieve the effect of an worn and used leather. Multiplying one of the textures and using fx effect- inner shadow, so could get a better definition. Also, I applied and Hue/Saturation on them as you can see below:


I decided on working on the textures for the pages for which I used the same method. I used images from the internet and applied them to my texture sheet. Putting them on top of each other and erased parts I didn't needed. Also I used the brightness/contrast effect on everything. You can see on the images below:


After finishing with the pages and returned back the the cover. Using my UV's as a guide I used the fx effects: inner shadow and outer glow, I got very good definition and give the impression that it's a depression in the surface.

I've now use the Marquee and Line tools to create some spine details. The lines where stroked and after that I added Bevel emboss Layer style fx to add some bump detail. In the areas where I am going to place text I have added some block colour underneath the embossed line. I've set the layre on multiply to allow the leather texture to show through. After I've done this I added the text to the cover using 2 different fronts, an vivaldi one for the front cover and Segoe UI for the spine. I used cold colour for it and again added the Bevel emboss and stroke layer fx settings.


The next step after this was to add some details to the cover. I found some cool celtic symbols and after some tweaking again using Bevel emboss and stroke layer fx style.

For the clasp I used some rusty textures I found and put them on top of each other. I erased what I didn't needed of the texture. The hinges, rivets and engraving were all done with outer glow and bevel emboss layer fx style.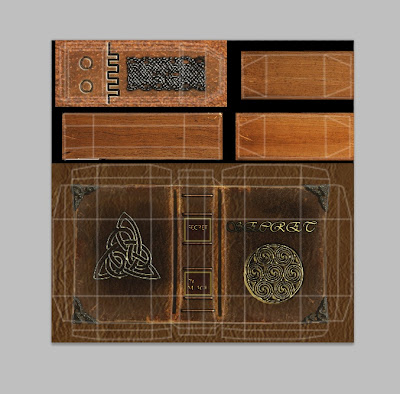


And finally I rendered the model in Marmoset Toolbag and here is the final result:

No comments:
Post a Comment